Fabric puckering is one of the most frustrating problems in machine embroidery. You finish a design, remove it from the hoop — and suddenly the fabric looks wrinkled, wavy, or distorted. This happens to beginners and experienced embroiderers alike.
Puckering is not usually caused by the machine or the design itself. In most cases, it’s a setup issue — specifically incorrect hooping, insufficient stabilizer support, or unbalanced tension. Puckering is essentially a tug-of-war where the thread tension wins and the fabric loses.
Follow this proven 3-step embroidery puckering reset to achieve flat, professional-looking results.
Step 1: Master the “Taut, Not Stretched” Hooping Technique
Improper hooping is the number one cause of embroidery puckering. Fabric that is hooped too loosely will shift during stitching, while fabric that is stretched too tightly will snap back once unhooped, causing ripples around the design.
The fix:
- Hoop the fabric taut like a drum, not stretched like elastic
The stabilizer and fabric should move as one single unit.
Pro Tip:
Never pull the fabric to “tighten” it once hooped. Instead, loosen the hoop screw, lay the fabric flat, and press the inner ring down evenly. If you see waves in the fabric grain, re-hoop.
Step 2: Match Stabilizer Weight to Stitch Density
Using a stabilizer that’s too light for a dense design is a guaranteed way to cause puckering. Heavy stitch counts create thousands of needle penetrations, which weaken light stabilizers and allow fabric to pull inward.
Stabilizer rule of thumb:
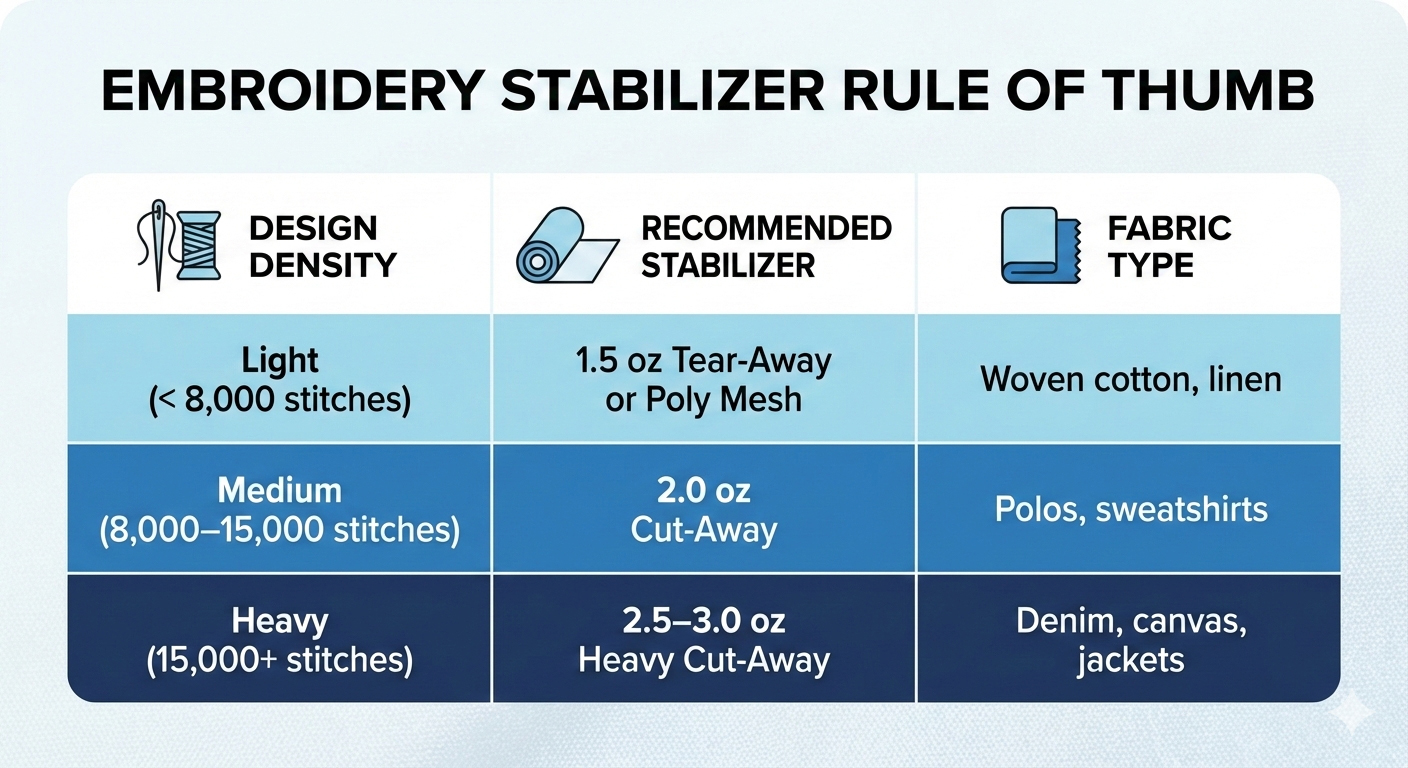
Important:
For knits and performance wear, always use cut-away stabilizer. Tear-away does not provide the permanent support stretchy fabrics need after embroidery is complete.
Step 3: Use the “2⁄3 Tension Check” on Modern Machines
Modern embroidery machines stitch at high speeds, which amplifies tension problems. If top tension is too tight, stitches will pull the fabric toward the center of the design.
How to check tension correctly:
- Turn the embroidery over
If puckering persists:
- Slightly reduce embroidery speed
Debris in the machine can cause sudden tension spikes that lead to puckering.
Quick Embroidery Puckering Diagnosis Guide
If your embroidery looks:
- Wavy after washing → stabilizer is too light
Fix the foundation first — embroidery problems almost always start there.
Frequently Asked Questions
Can puckering be fixed after embroidery is finished?
Minor puckering can sometimes be reduced using steam and a pressing cloth, but significant puckering caused by incorrect stabilizer or hooping is usually permanent. Prevention is the only reliable solution.
Why does embroidery pucker mostly on T-shirts?
T-shirts are knit fabrics that stretch easily. Using tear-away stabilizer allows the fabric to stretch during stitching and rebound afterward. Always use no-show poly mesh or cut-away stabilizer for T-shirts.
Does needle size affect puckering?
Yes. A needle that’s too large creates bigger holes, weakening the fabric. For most projects, a 75/11 embroidery needle provides clean stitching without excessive fabric damage.
Pro Tip: Stabilizer Choice Solves Most Embroidery Problems
Before changing machines, thread brands, or designs, always ask:
“Is my stabilizer strong enough for this fabric and stitch count?”
In most cases, correcting stabilizer choice instantly improves embroidery quality and eliminates puckering.
Professional Results Start with Quality Digitizing
Even with perfect stabilizer and hooping, poorly digitized designs can still cause puckering. Professional digitizing minimizes unnecessary stitch density and reduces fabric pull, resulting in cleaner, flatter embroidery.
Browse Embroidize’s high-quality embroidery designs to put the right foundation into practice.